Monday, May 14, 2012

Grocery Shopping Hungry

I know, I know, never go grocery shopping hungry.  But I did.  Friday I just needed to grab dishwasher detergent from the store.  I figured I would grab some lunch while I was there.  Get in, get out, go home, eat.  I grabbed lunch all right, along with a bunch of other goodies – cookies, scones, chips, guacamole, goat cheese, dry salami.  I just couldn’t control myself!  

IMG_2876

Lunch was suppose to be these pot stickers…

IMG_2877

…but ended up being a sea salt chocolate chip cookie in the parking lot, fruity stars, lemon poppy seed scones, dry salami and some cheese that was out as a sample that I ended up loving, so of course I bought.  They get you with those samples.

IMG_2878

On my little reckless shopping trip for dishwasher detergent, I also found these little guys.

IMG_2879

I love dark chocolate and sea salt, so I couldn’t resist trying this dark chocolate bar with BBQ potato chips in it.  The point to this reckless shopping trip…it was delicious!

Can’t keep this little find to myself.

IMG_2880

I told myself my crazy little shopping trip was ok because it was my very own Mother’s Day treat to myself.  Hope you all indulged in something too!

Have a great week!

Kim

Friday, May 11, 2012

Creating Monogrammed Journals

The case of the missing letters

I was pretty giddy when I found the black and white journals for Erin’s mystery party for only a dollar!  Only trouble was, I couldn’t find two of the initials I needed.   After checking three Michael’s with no luck, I decided to replicate the look.  I was stuck on these journals, so I didn’t want to give up on them just because I couldn’t find two.

So I grabbed some black and white polka dot paper and a big black initial sticker.  The sticker didn’t look quite right, so I decided to print off letters from my computer.  At first, I thought I’d have to cut around the letter, but quickly decided I didn’t have the patience for that and just cut a square around the letter.

The journal with the letter “n” is the original and the “a” and “s” journals are my copy cat versions.  Can you tell the difference?  Yes, I know you can, but I thought it was close enough.

I covered the “a” journal with the big polka dots.  For the “s” journal, I decided to get a little fancy and put a strip of the bigger polka dots down the middle letting the original part of the journal with the small polka dots peek through.  Actually, the truth is, all I had left of the polka dot paper was a strip and I was too lazy to run to the store for more.

IMG_2653

And since they were in the goody bags, the girls really wouldn’t have time to compare the difference, so I had that going for me tooSmile

IMG_2652

And that is how I solved the case of the missing letters.


To all the Moms out there, have a fantabulous weekend!!

Happy Mother’s Day!

&

Happy Friday!

Kim

Wednesday, May 9, 2012

Blog for a Cause: Out of the Darkness

Blogging has been such a great outlet for me.  This community has given more to me than I could have ever imagined.  I am so grateful to have a place to voice ideas and even some random ramblings.  For a while I’ve been thinking that I have a great opportunity to also use my voice to help others and create awareness.  So today’s post is different from my usual.  It is one that I hope helps somebody out there.  Your time is valuable and I so appreciate you taking the time to read this today.

It used to be that I would donate to any and every cause, then reality set in and I realized that if I wanted to pay the bills, I needed to really focus on causes that are meaningful to me and not feel guilty when I don’t donate every time I’m asked. Unfortunately if it’s meaningful to me, it usually means that something misfortunate has happened to someone in my life.

Ten years ago, my dear friend Laura lost her brother to suicide.  Unfortunately, Laura is not the only person in my life that has been struck by this tragedy.  The sad truth is that a suicide attempt happens every minute of every day and someone in the U.S. dies by suicide every 16 minutes.

For the past four years, Laura has honored her brother in the Out of Darkness Walk.  Thousands of walkers gather from all over to walk 18 miles through the night starting at 8:00 pm and ending around 3:30 am.  This year the walk is on June 9th in San Francisco.  It will be Laura’s fifth year walking and I have yet to join her in the walk.  One day I will walk with her, but for now, I want to help any way I can.  I’ve asked Laura to share more with us about the Out of the Darkness Walk and what it does for suicide prevention and those touched by suicide.

I would say that what I find important about doing this walk and contributing to this cause is to help to break the stigma of suicide and mental illness. For many years, families have been living with the tragedy of a suicide of a family member or someone who suffered with mental illness and kept it a secret because they felt it was something to be ashamed of. The American Foundation for Suicide Prevention has helped to bring this stigma "out of the darkness", and into mainstream conversation. Additionally, with their research, they are helping to detect depression and mental illness at an earlier stage so that interventions can be used. They are also helping to bring materials to schools, such as educational movies and teaching materials, so that students and parents are aware of the signs of potential suicide.

In my own experience, the Out of the Darkness Walk has provided me with an opportunity to heal; to meet a community of people with similar experiences, to bridge conversations about my own family's tragedy, and to share with family members and friends the opportunity to create something positive in its' wake. Each year I have been amazed by the generosity, support, and kindness both of the donors and of my fellow teammates who make such a financial effort as well as a time commitment to be a part of the walk.

Laura has seven members on her team.  To be able to walk, each team member must raise $1,000.  Three of her team members have met their goal, but there are still four members that need to reach their goal to walk.

My hope today is not to make you feel guilty or obligated to donate, but to create   awareness, provide resources for people and help break the stigma of suicide.  There are so many causes out there that it’s impossible to help them all out, but if this is something that touches your heart and you would like to donate, please go to Tommy J’s Pit Crew page on the Out of the Darkness website.  This page will list Laura’s teammates and the amount raised for each team member.  If you choose to donate, please choose team members who have not yet reached $1,000.  Any donation is greatly appreciated.

Thanks for taking the time to read this today.

- Kim

Monday, May 7, 2012

Blog Hop from Randee's Organized Chaos

Unexpected Cake Topper & EASIEST Chicken Tacos

Saturday Erin made her First Communion and we decided to celebrate Cinco de Mayo style since it was in fact, Cinco de Mayo.

IMG_2801

IMG_2802

These past few weeks have been super busy, so I wanted this shin dig to be super easy!  Here’s what we did….chips and salsa – easy…

IMG_2804

veggies and dip – super easy (my MIL brought them, can’t get easier than that) and a taco bar – ground beef or chicken.

The chicken taco recipe I used was ridiculously easy!  The funny thing is my friend told me about it and guess where she got the recipe…my sister!  Too funny.

EASIEST Chicken Tacos EVER!

  • 4 chicken breasts (adjust this number to your size, I used 8 for the party)
  • your favorite salsa

Directions:

  1. Put the raw chicken breasts in a crockpot.
  2. Dump your favorite salsa over it.
  3. Walk away for a while. 
  4. Once the breasts are cooked, shred them with two forks and BOOM, that’s it!
  5. Eat!

** If you can do it the night before and reheat the next day, even better…helps the flavors soak in.

I also made my favorite avocado bell pepper salsa that you can eat with chips or eat just as a salad.  It’s sooo good.  So we had two crockpots of taco meat and chicken, all the toppings, munchies and of course we can’t forget dessert!

As you know, I’m lucky enough to have a chef for a sister, so she brought this delicious vanilla mousse cake.  I told her I would take care of the decorations for the top.  I was going to make tissue paper flowers attached to bamboo skewers, was going to buy flowers, was going to find a cross to put on it…in the end, I did not have time to make or find any of those things.

So when I was on my Target run, I came across these pretty little chipboard flowers in the scrapbook section.  I thought, why not?  My first thought was to try to find a pretty communion card that I could dismantle and use on the cake, but there weren’t any pretty communion cards to be found, thus the scrapbook flowers became the decoration…what do you think? 

IMG_2809

I was really happy with it…yes, I put them on a bit off-center, but I was to the point where it just didn’t matter. I wanted to savor this moment with my family and not worry about the rest.

IMG_2824

Oh, and I picked up cupcakes from Taste Love Cupcakes.  I mentioned on Facebook that one of Erin’s friend’s mom’s recently won Cupcake Wars on Food Network Channel.  Both Erin and I were beyond excited about this, so we thought the cupcakes would be a nice addition.

IMG_2823

I like getting creative with parties, but I also like to be able to enjoy them while I’m there, and this was just that kind of party.

Easy, easy, easy so I could enjoy the reason we were all together!

IMG_2793

For more fiesta inspiration, check out my Cinco de Mayo pinboard.

Friday, May 4, 2012

Almost Free Teacher Appreciation Gifts

Hello, hello!  Next week is Teacher Appreciation Week at our school.  We are not allowed to spend money on gifts for the teachers, so here’s what I came up with for Kyle’s kindergarten class.

Fingerprint Card

Since I was on the fingerprint bandwagon from Erin’s Mystery Party, it sparked the idea for this card.  I just had each child put one fingerprint on the card to make a couple flowers with everyone’s fingerprints combined.  The card read, “Thanks to you, we are in full bloom!”  Easy and free if you already have the ink pads.

IMG_2781


IMG_2784

Bucket Filling

Our school, like many other schools, has adopted the bucket filling theme from the book, “Have you filled a bucket today?” by David Messing.  The gist of it is to fill someone’s bucket by doing and saying nice things to each other and not dipping in people’s buckets by saying and doing mean things.

So I thought it’d be fun to play off that idea and literally fill our teachers’ buckets with nice notes.  The lid of the bucket reads, “Thanks for always filling our buckets, now it’s our turn to fill yours.” 

IMG_2734

IMG_2736

I’ve been itching to do this because I’ve had this bucket sitting in my cupboard for two years!  My son’s third grade teacher had her baby right before Teacher Appreciation Week so we never got to give it to her.  Oh, yes, I did have to buy the buckets, but, shhhh, don’t tell my school.Smile

Since Kyle’s class has two teachers, I was still not able to use that butterfly bucket because Michael’s didn’t have the butterfly print buckets anymore.  I wanted both teachers to have matching ones so I bought plain clear buckets.  To cute it up a bit, I added a monogram with some ribbon.  I actually like it better than the butterfly bucket!  Love it when that happens!

IMG_2774

IMG_2776

IMG_2777

IMG_2778


IMG_2780


Artwork for the Classroom

This last project is a nod to my cardboard box heart art – completely free and repurposed!  Depending on the supplies you have on hand, it will be free or a very minimal cost.  First, I grabbed a free printable of classroom subway art at eighteen25.  Next, I unfolded the box edges and cut them off so I had a flat piece of cardboard.  Other options would be cereal boxes, old gift boxes, any cardboard. 

IMG_2726

I framed it out in “washi” tape that I found at Target in the office supply section.  I think they call it decorative paper tape, comes in a four pack of complimentary colors. 

IMG_2729

Then I just punched holes in the top to put a cute ribbon through for hanging on a bulletin board, door handle or wherever it works in the teacher’s class. It’s lightweight, so it makes it easy to hang anywhere. It just took me about 15 minutes to make. Love it!!

IMG_2733

Not that anyone will see the back, but just in case it gets flipped around, I wanted it to look better than just the box top logo.  I finished it off by taping the back in a simple horizontal pattern. Yes, you can see the logo from the box peeking through, but that didn’t bother me since it’s not likely that side will be on display.  Actually, now that I’m thinking of it, I will cut a square of cardstock to fit over that spot to say it was from the 2011-2012 class.

IMG_2737

I’m in love with this subway art project!  Love that it’s super easy and pretty much free!

IMG_2784

                            IMG_2778IMG_2733

So these are my three almost free Teacher Appreciation projects.

Hope you can use them now or even at the end of the school year!

Happy Friday!

Kim

Thursday, May 3, 2012

The Mystery Party: Part 2

Boy oh boy, this is a long one, so I’ll get right to it!

The Craft

IMG_2669

We played off the mystery theme and did fingerprint art as the craft.  The first thing I had the girls do when they got there was create a detective badge.

IMG_2773

Next, they made artwork out of their fingerprints.  They really impressed me.  They all came up with super cute pictures.  Flowers quickly became the creation of choice.  Then they decorated their frames.  Michael’s had 12 packs of these cardboard frames for $1.  They used foam stickers and black and white polka dot tape and daisies also from Michaels.

IMG_2755

IMG_2756

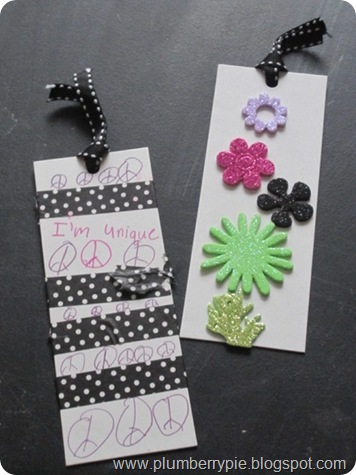
Some girls also made bookmarks.  The bookmarks were also available in 12 packs for a dollar.  They really got excited about the polka dot tape!
IMG_2754

The Clues

So here’s the part that made my head spin a bit, figuring out exactly how I wanted the mystery and clues to happen.  When Erin told me she wanted to do a Mystery Party, I knew exactly why.  Her and her friends had so much fun following clues to find the loot bag at her Hoedown last year, I think she wanted to repeat that fun.  So the challenge for me was to find a way to make this party different from the Hoedown.

After perusing some online Mystery Party packs that included a story along with characters and a “who done it” scenario, we opted to go a different route.  I decided to compile a bunch of ideas I found during my research.  Instead of just having a clue lead to another clue, I gave the girls eight missions (which worked out nice since she was turning eight, happened completely by accident).  After the completion of each mission, they would receive a clue, which was a single letter.  At the end of all their missions, they would then take all the collected letters and unscramble them to make a word.  That word would lead them to the “jewels”.

To kick off the missions, I read them a letter that I “found” when I was ripping out the carpet in the playroom.  It was a letter from the previous owner saying they left us jewels and clues to find them.  If you want the letter, feel free to email me and I will send it to you.

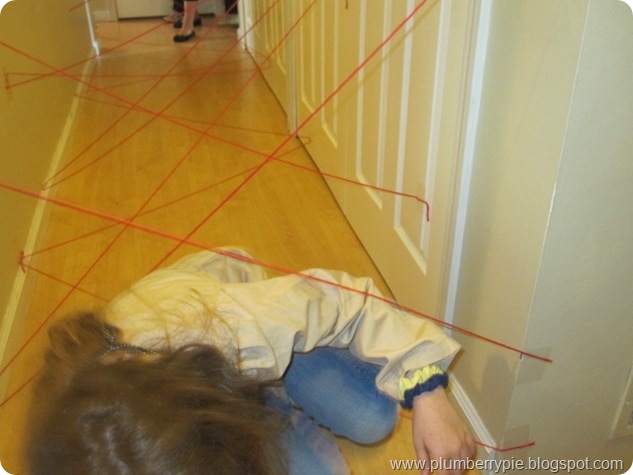
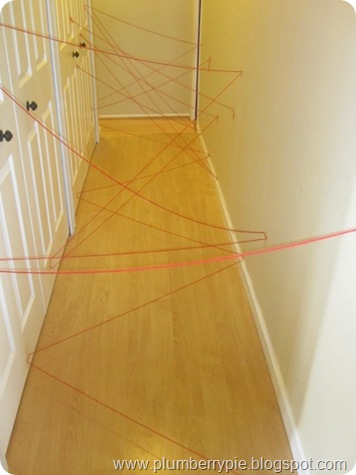
Mission 1:  The Laser Beam Challenge

When you all make it through, I will give you your first clue.
IMG_2662

The goal was to get through the laser beams without touching them.  The girls got a kick out of this.  We weren’t hardcore about it.  If they touched a “laser beam” we told them to keep on going…no time to do a redo! Smile

IMG_2679

Mission 2:  The Balloon Bomb Pop

To stop the bomb, jump on top, And you will find the clue as they pop.

A couple things to keep in mind about this one.  A couple girls left the room because they didn’t like the noise, one jumped with both feet and rolled off landing on her bum and the possibility that you can’t find the piece of paper with the clue on it.

Luckily, we thought of that beforehand and I had an extra clue in my pocket in the case they couldn’t find it after popping the balloons.  Should they not find it, I would sneak the clue out of my pocket and drop it on the ground.  And that is exactly what happened!  So glad we had that back up plan.  It ended up two of the balloons were stuck in the garbage bag and we didn’t know it.  I put little folded pieces of paper in each balloon.  All of them were blank except one had the letter “R” on it.


Mission 3:  The Invisible Ink Challenge

At first you might not see it, Use a little science to reveal it.

The day before I used a Q-tip and lemon juice to write clues on manila file folders.  I tested this on regular paper and cardstock and it seemed the thicker, the better, so I cut up a bunch of file folders and those worked best.

To reveal the clue, the girls painted with 100% grape juice.  There is a chemical reaction that makes the picture show up.  One person had the clue “W” and the rest had pictures of peace signs, smiley faces, etc.  I recommend sponge paintbrushes because they get more coverage with less strokes.  We used both regular and sponge paintbrushes and the regular ones tended to oversaturate the picture and you could not see it as clearly.

IMG_2685


Mission 4:  The Tiny Print Challenge

Have you ever seen such small print?  Use a magnifying glass, don’t squint.

For this one, I decided to just let the birthday girl have a chance to read tiny print with a magnifying glass.  It was funny because when I held up the piece of paper with the tiny clue on it, the girls couldn’t even see it.  So it made it all the more fun when Erin read it with the magnifying glass…a teeny, tiny “E”.


Mission 5: The Backwards Words Challenge

You need a mirror to see this clear. (Yes, yes, it’s an S!)

Each girl received a strip of paper with a note written in a backwards font. Then each girl took a turn in the mirror to read her special note.  The notes said things like, “You are a great friend,” “You’re cool,” “Hug your mom,” “Brush your teeth twice a day.”  As you can see above, the person with the clue’s paper said, “Yes, yes, it’s an S!”  We rigged it so the last person had that paper to give everyone a chance to read the paper.


Mission 6:  The Mystery Box/Secret Keeping Challenge

A great Detective uses all five senses – sight, sound, smell, touch & taste.

For this one, you need to touch. Reach in the box, do not haste.

Each girl put her hand inside the box to figure out what the item was by touching it.  I thought this one was going to get spoiled quickly by the girls shouting out what it was, so at the last minute, I also turned this challenge into “the secret keeping” challenge so that the next person in line could still have the fun of putting her hand in the mystery box.  And to my surprise and delight, they stepped up to the challenge and kept the secret until each girl went.  I could not believe they actually did it!!

It was fantastic seeing the looks on their faces after they stuck their hands in the box.  It was that of a cringe, with a little comment of “ewww”.  Everyone quickly washed their hands.

What was in the box???  Spaghetti.  I think since I took it out first thing that morning, it made the spaghetti sweat a bit creating a watery, slimy effect – even better!!


Mission 7:  Your Nose Knows

Now that you’re done with that fun.  Go where all the cooking is done.

Time to smell.  I wish you well.

I think this was one of the girls’ favorites (and the laser beam challenge).  It was mine too.  I had nine different baby food flavors with a number on each container.  Each girl had a piece of paper with the numbers 1-9 on it.  They all had a turn to smell the baby food and fill in their guess on their sheets.  I bought two sets of baby food so that the party was divided in two, allowing everyone to do it at the same time.


Mission 8:  The Word Scramble Challenge

L  R  W  S  O  F  E

Can you guess where the jewels were hidden?

IMG_2659

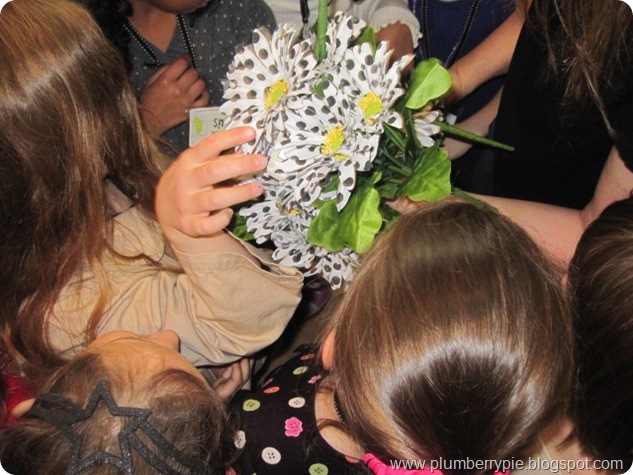
Yep, these flowers weren’t just for decoration!
IMG_2689

Hidden underneath the flowers, were jewels we actually had leftover from Erin’s Luau sandbox treasure dig.  The bag of jewels were just a prop.  I also had bracelets and ring pops underneath the flowers for the girls to keep.

IMG_2765

IMG_2770


The Goody Pack

Instead of bags, I used manila envelopes to look like official Top Secret stuff.

IMG_2668

Inside the envelope:

IMG_2761

IMG_2759

Attached to the magnifying glass was a note written in tiny print saying, “Thank you for celebrating with me! Love, Erin”

I got both the secret decoder and the maze free from Family Fun's website.

For the Guilty Party Joke Decoder, click here.

IMG_2762

For the Guilty Party Maze, click here.

IMG_2763

And I found this word search website from one of my friends.  She used it for both of her daughters’ birthdays.  The coolest thing about it is that you are able to choose the words you want in the word search to create your own and it’s FREE.  Super easy too!  So I did one word search with the name of each girl that attended and another word search with mystery words.

Go to Discovery Education's website to make your own word search.

IMG_2764

So that wraps up my little birthday party series!  If you missed any of them, click on the Party Ideas tab at the top of the page.  Hope this series has inspired you for your next party!

To see the invitation, decorations and cake from this party, go to Mystery Party:  Part 1.

To see where I found much of my inspiration, go to my  Mystery Party Pinboard on Pinterest.

Goody Pack sources:

  • Mustache disguises – 4 packs in Target’s party aisle
  • Bracelets – 4 packs in Target’s party aisle
  • Colored hair clips – 4 packs in Target’s party aisle
  • Sunglasses – Target dollar section
  • Pens – 2 packs in Target’s dollar section
  • Ring Pops – Dollar Tree
  • Journals – Michael’s dollar section
  • Magnifying glasses – 12 packs at Party City
Related Posts Plugin for WordPress, Blogger...