Friday, January 6, 2012

Organizing Tips and Clutter Counter Update

So I did it!  I made it the whole week with papers flying in from school and I was still able to MAINTAIN my dreaded clutter counter!  Yehaw!!

Although I am organizational challenged, I will share some organizing tricks that have worked for me (for the most part).

Baskets on the Stairs
These serve as a collection center for the kids' stuff throughout the day.  They save us from crazy clutter piles all over the stairs.  Currently, we are great at filling them, not emptying them.  Hey, it's a start.


The Cubbies
Sometimes it takes many "mom reminders," but it is the home for coats, boots, shoes and backpacks.


Magnet Clips on the Bins above the Cubbies
These save my life for important school stuff like weekly spelling lists or long term projects. They are there when we need to refer to them.


Activity Binder
This binder holds team schedules, phone numbers, activity information, invitations, etc. all in one place.

Cork Board Inside Cabinet Door
My quick "go to" for neighbor numbers or things I don't want to lose in a pile.  Could also use the binder, but sometimes it's nice just to open the kitchen cabinet to grab one phone number.


Pencil Bin and Paper Drawer Just for the Kids
I was tired of the kids constantly asking where a pencil or piece of paper was, so now they have their own designated stash.

Lingerie Bag to Corral Socks
I love this idea, but don't do it enough.  Socks are one of my biggest enemies.  This keeps them together and easy to pair up.  My goal is to get each child a bag so when they take off their socks, they simply put them in the bag.  And the best part would be after I wash them, I can just give each child their own bag of socks.  BOOM!  No sorting for me!

Hooks! Hooks! Hooks!
This is my favorite! Seriously! I can't get enough hooks.  They are so user friendly to all and can hold so many different things.  Wet swimsuits, towels, snow pants, coats, bags, purses.  My husband is probably chuckling because I talk about it every time we go on vacation.   If I ever own a vacation home, there will be hooks, and lots of them!


What are your best organizing tips?
I could use as many as I can get. 

One last thing.  I cannot talk about organizing without sending you to the master of organization, Jen at i heart organizing.  If you need inspiration to get yourself moving or new ideas, she's your gal!  A visit to her blog will keep you focused and motivated.  Happy organizing!

Wednesday, January 4, 2012

Half Bath Change of Heart

So I mentioned that because I don't finish my projects completely, I end up changing my mind about what I want to do with them.  My half bath is a prime example.  At first I didn't have a vision or inspiration for the room, but wanted to do a mini-makeover, a lipstick fix to hold us over.  I finally found inspiration in a hot pink color palette that I found in this room by Natalie Umbert.  Loved this room!  Too scared to do a big room in this pink, I thought the bathroom would be the perfect place.

Natalie Umbert

So my plan at that point was to paint the vanity black to ground the room and offset the pink. Then on my hunt for artwork, I found these at Home Goods.  The price was right and they had that pop of color I was looking for.


Since the artwork worked with the current wall color and I was feeling lazy didn't go with the pink paint chip, I decided to skip painting and just hung the artwork.  Black would still work for the vanity, but to blend with my ugly tile, I opted for espresso in the hopes it would help the tile fade away.  

This tile reminds me of my elementary school bathroom.  Given a different color and materials, these tiles could be hip and modern...but they are NOT. 


So I painted the vanity espresso and found a streamlined mirror in the same color.   I have a new faucet waiting to be installed, but it seemed wrong to install it on a counter with a seashell sink.  My plan was to buy a builder's grade white vanity top from Lowes or Home Depot as my cheapest option.  But wouldn't you know it, the standard size now is 49 inches and mine is 47 inches.  I thought maybe it could work, but the sink would be off-centered and add all kinds of issues.

Then I thought, wood, what about wood?  Is that crazy?  Low and behold, I found someone who actually did it!  And cheap!  They purchased butcher block from IKEA.  (Read about how this couple stained and installed the butcher block at Welcome to Heardmont.)  So that was my solution.  However, time restraints and everyday life seem to always stop me from completing this project.  

Didn't the folks at Heardmont do a great job?!

So the point to this long winded story is that since I never finished this project, there has been time for new ideas to grow. 
Like this.
Or this.
Now I've got the itch to start all over again. UGH!

But for now, my to do list is so long, that I will live with what I've got...except for the fact that sea shell sink is screaming to be thrown to the curb!!!!!!! 

Oh, here's what it looks like now...


So what do you think?
Do I do the butcher block counter or
do I just add the new faucet to the seashell sink
until I can do a total makeover someday - new vanity, tiles, etc?
I would love to hear your thoughts!

Monday, January 2, 2012

Confessions of the Clutter Counter

WARNING:  For those with inborn, natural, organizational skills, you may want to look away.

Introducing my clutter counter...


Do you have one of these too?  I am that person who frantically clears the counter into a bag, stashes it in my office and shuts the door for a party in the hopes no one stumbles into my office:). This, of course, leads to the cluttered office. Ahhh, the domino effect.

I realize some of you are wired with the organizational gene and cannot fathom how anyone can get to this point.  For as much as I am obsessed with home design and decor, you would think I would be obsessed with keeping things tidy to maintain the decor.  However, I cannot keep it together.  It's not that I think things need to be perfect, but just ready for a "pop over" visitor.  That's all I want. 

The clutter counter is the symbol of my biggest challenge, maintaining organization.  When it comes down to it, it's really a maintenance issue. I've read all the tricks and tips to organization and I've tried time and time again, but I can't maintain! I'm constantly working in what my husband and I call the "rampage" mode. We need a fire under our booties to get us moving. Our threshold for disorganization is just too high.  So my power word for the year is MAINTAIN.

If I can step up to the challenge, a good domino effect will happen! I will lose my fear of the dreaded "pop over" visitor. I will invite people over at the last minute. I will be able to find what I'm looking for before I have to buy another one.   I won't go into panic, rampage mode before a party.  Can I do it?

MAINTAIN Week 1:
The Clutter Counter Challenge
Introducing...my CLEAN counter


Ain't she purty?  Now for the office.  UGHHH!


Sunday, January 1, 2012

2012 To Do List

As I mentioned on my very first post, I am the Queen of Unfinished Projects and I am hoping that this blog will hold me accountable to get her done!  So on that note, the loooooong list of to do's for 2012...

Current Unfinished Projects:
  1. Half done laundry room
  2. Take down wallpaper paste in upstairs hall and paint
  3. Repaint kitchen table
  4. Paint inside of cupboard above fridge and stove
  5. Weather kitchen cabinets
  6. Paint family room baseboards white
  7. Vanity top, faucet and ring pulls for half bath
  8. Second coat of paint on guest room walls and bedside tables
  9. Bamboo shades and drapes for family room
  10. Reorganize play room
New Projects:
  1. Refresh family room - repaint walls...possibly paint some shelves white
  2. Paint mom's old kitchen table for playroom game/homework/art table
  3. Paint and turn old frame into cork board
  4. Paint dresser for spare room
  5. Paint foyer wall
  6. Paint table in foyer
  7. Organize, organize, organize
Actually, my head feels like it's going to explode.  Perhaps I won't write the entire list now;).  We'll go month by month, week by week, day by day, depending.  A problem I encounter over and over is that since I don't finish a project completely, I find myself changing the direction I want to take with that project.  So for 2012, my resolution is to complete a project before I can move onto another to avoid the change of heart syndrome.  Keep me accountable, people, keep me accountable!

Saturday, December 31, 2011

One Last New Year's Eve Idea

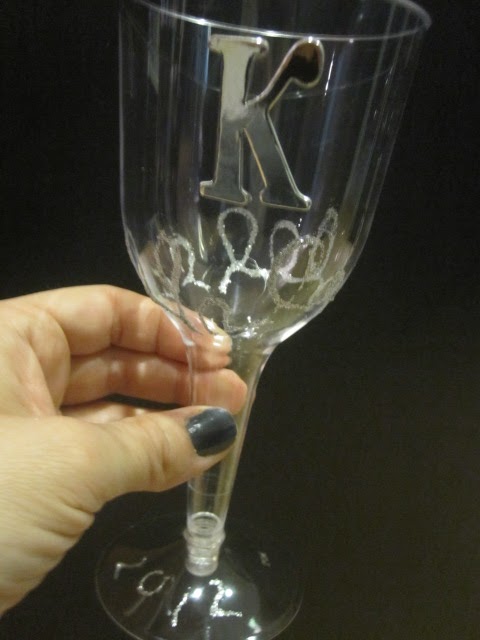
Okay, so this is really last minute, but I only just discovered this fun idea yesterday when I dropped my son to his friend's house.  His friend's mom was in the middle of this project when I walked in and I decided I had to do it too!  She was decorating plastic wine and champagne glasses for New Year's Eve.  I didn't have time to go grab the cups, but she was sweet enough to give me her left over glasses.  Thank you, Kristin!

You can choose whatever you want to decorate with.  My friend put little bells on the base which I thought was genius to shake at midnight.  I didn't have bells, but we decorated with pom-poms, gems, chipboard letters and glitter glue.  Oh, and of course, my new favorite tool, glue dots.  I will note that the glitter glue was coming right off this morning after it dried, so beware.  I'm sure there's a better option.  Also, did I mention I need photography lessons.  Please bear with my poor photos.


You can do fun and festive....


A little sophisticated...


Or a bit of both.


The kids and I had so much fun with this project and they turned out great!
(not sure if you can tell by my photos)
PS - you could always do this for a birthday party if you miss New Year's Eve.

And one last fun idea I discovered at 30 Handmade Days was a fun recap/goal sheet for us to do.  One is made for kids and one for adults.  Check it out if you have time.  There's always next year!


Happy New Year's, Everyone!
Be safe and have fun!
Kim


Friday, December 30, 2011

New Years Eve Fun

Hi there.  Just a quick post to share a fun thing to do on New Year's Eve with the kids.  Get yourself some bubble wrap rolls, one for each kid.  At midnight, roll them out and let the kids run up and down the strips, stomping their feet to celebrate the new year.  The kids get such a kick out of it and it doesn't hurt your ears as much as those blow horns J.  I bet you find yourself jumping on one, so pick up a roll for yourself too.  Good fun!


Happy New Year &...Happy Popping!

Thursday, December 29, 2011

New Tradition

This year my daughter wanted our family to do Secret Santas together.  We didn't send each other notes or clues, just a simple gift on Christmas day.  The beauty of this was that it helped us tune into each other by finding or making thoughtful gifts for each other.

My daughter had her younger brother and gave him homemade slime, snowman face gum, "Grinch Pills" and a kitchen timer. A kitchen timer may sound odd, but he's a gadget guy and if you knew him, it would all make sense:). We found the slime, snowman gum idea and Grinch Pills all on Pinterest.


Sources: You can go directly to my Christmas board on Pinterest or directly to the following links.  Slime recipe from Our Best Bites, snowman gum idea was linked to My Uncommon Slice of Suburbia on Pinterest, but I couldn't find it on the blog, but I did find a great blog!  It's ok because the gum project is self-explanatory - just wanted to make sure I gave proper credit.  The Grinch Pills are from Scrapcation Getaway. She did an entire case with a "scut file". I had no idea what a scut file was, so I just saved the pic of the Grinch Pills poem and printed and taped it to the Tic Tacs container.

My youngest had my husband and he gave him the sweetest poster made out of wrapping paper with his hand print and a homemade bracelet.


I was Secret Santa to my oldest and copied off my daughter with the snowman gum and Grinch Pills.  To personalize it, I added a Hex bug and an invention I created especially for him.  My son has a tendency of losing bookmarks, so instead he uses tissues to hold his page.  And if he loses the tissue bookmark, he simply replaces it because there is a tissue box next to his bed for an unending supply of bookmarks:).  So I took a binder clip to be clipped to the back of his book and attached a braided bookmark to the clip to be flipped in and out without being lost because it's attached to the binder clip which is always attached to the back of the book.  Hope it works!


 My oldest had my daughter and gave her some Magic Tree House books to fill in the gap of ones we didn't have and my husband had me and gave me Ellen's new book (I love her!) and some new Chai tea to try because I'm hooked on Chai tea.


It was truly very special and sweet to see the thought and love put into everyone's gifts.   I look forward to continuing this tradition for the years to come.

I also want to share a clever gift bag idea before I sign off.  My daughter's class made gifts for their families and wrapped them in brown paper bag gingerbread houses.  I thought it was such a clever idea! 


The gift inside was super cute too!


Make sure to stop by again tomorrow to see a fun New Year's Eve idea.

Thursday, December 22, 2011

Look What I Got

Just had to share this cute mason jar gift my friend gave to me.
How fun is this?!


She made the marshmallow snowman faces with edible markers.
I never knew there was such a thing.
Fun Stuff!


And here's something I grabbed while out braving the mall last night - a Capri Blue Volcano scented candle from Anthropologie.  A good friend of mine gave me a gift card last year and I actually had it with me for once!    


Every time I drag my husband and I walk into Anthropologie, we are drawn in by this scent.  The first time we walked through the store like Toucan Sam, following our noses until we found where it was coming from.  I've wanted it for a while, but wanted the mercury glass container (they usually come in cobalt blue or red).  And in came the holidays and the mercury glass was back!  Yay!  I was also holding back because I haven't really lit a candle (besides birthday cakes) since kids.  I finally decided that the kids are old enough and I love the scent enough to live on the edge. 


I wish you could smell it through the computer, it's heavenly!

Crazy, could have been horrible, side story...I finally lit a candle last weekend (before I grabbed this one) and left the house for 8 hours with it lit!  Came home and everything was still in tact.  Thank God!  My guardian angel was watching over me.  Unbelievable!  I hope the glass jar will keep it contained if I ever do that again.

Tuesday, December 20, 2011

Winter Class Party

Heads up, this is a slightly long post.  Just wanted to share what we did for my son's kindergarten winter class party.  It will be divided into three parts - the Disassembled Snowman Snack, Snowman Water Bottle Craft and my favorite - the DIY Snowglobe Gift Card...obviously a snowman theme going on.  The great thing is that you could use any of these ideas throughout the winter just for fun.

Playing off our snowman theme, we created a "disassembled snowman" snack.  It was simple, fun and it covered sweet, salty and healthy.

Disassembled Snowman Snack
  • Carrot Noses
  • Melted Snow (Ranch dip)
  • Coal Eyes & Mouth (mini Oreos)
  • Stick Arms (mini pretzel sticks)
  • Hats (crackers with cheese cube stuck on top with squeeze cheese, could also do with fudge cookie and smaller cookie on top, but we needed to balance the sweet and salty)
  • Snowballs (powdered doughnut holes)
  • Juice and water (we were going to do hot chocolate, but logistically, juice and water were easier)

I used a dispenser for the water, rather than water bottles to give kids the choice between juice or water.  My jug looked too much like summer, so I wrapped it with a white towel and cut out foam shapes for the face of  a snowman and added a hat I had from a snowman kit.


Water Bottle Snowmen Craft

What you'll need:
brown pipe cleaners, black and orange beads, glue dots (my new best friend), cotton balls, black paint, black construction paper, 2 inch hole punch and/or scissors, garland or ribbon for a scarf


We were working on limited time and with a group of kindergartners so I did a bit of prep work.  I painted the lids black and tied on the scarves.  For the arms, I cut one pipe cleaner in half, then folded each piece in half and twisted around itself until I had a "y" shape.  Then I used a razor to create slits on each side of the water bottle to insert the arms.  I used glue dots to stick the beads on strips for each child.  This way there was no glue mess or dry time time to contend with.  It was also helpful because it provided each child the amount of beads they needed without beads rolling around everywhere.  I also pre-packaged sandwich bags with 10 cotton balls each because you know they would stuff that water bottle with as many cotton balls as they could if given the option:).  The rims of the hats were two inch circles of black construction paper with a hole the size of the cap in the center so it could be slipped right on top.  (I used my two inch hole punch, then traced the cap in the center, then cut out centers.)

Don't these look like dot candies?

We had a volunteer to lead the craft at each table, so I gave each volunteer a grocery bag with all the supplies needed for that table.  It was lot easier to have a person at each table teaching six kids, rather than one person trying to keep the attention of all 24 kids at once.  I will definitely do that again!

Sandwich bag with 6 bead strips and 6 hat rims ready to go
in a grocery bag with the other supplies.

To avoid snowman mix ups, we gave each child a white lunch bag to decorate with a snowman face and their names.  That way they could pop their little snowmen in the bag for a safe ride home.  Added bonus:  if any body parts fell off, they would fall into the bag for repair when it got home.

I also made glitter and peppermint scented play dough as a back up in case we had extra time.  But the snack and craft were just enough.  You could also make snowmen out of the play dough with the same supplies.


Teacher Gift: Snowglobe Gift Cards


We presented our gift cards to the teachers in DIY snowglobes.  A few years ago, my sister tipped me off to the DIY snow globe and it's been on my to do list ever since.  You can do the snowglobe wet or dry.  I read an article that said they tested putting a gift card in water for a week, but I really didn't want to chance it, so I kept our snowglobes dry.

Supplies:
jar (I used salsa jar,already had silver lid too),
 mini snowmen, trees, fake snow, snowflake confetti, glitter, glue gun, gift card

    To attach the gift card to the lid, just run a thick bead of glue onto the lid and stick it in.  I did a test run and found it took some muscle to pull the gift card off, so I traced white cardstock and folded it up about a 1/2 inch in the front and covered the entire back of the gift card.  The cardstock would be easier to break free and I simply put a glue dot on the back of the gift card so the cardstock stayed attached like a one sided envelope.  You can certainly do it without the cardstock.

    Aren't they cute? 


    I made one for myself while I was at it!  For mine, I used a pickle jar and wasn't so lucky with the lid color this time, so I painted it silver.  And I decided to experiment with glue dots instead of the glue gun to adhere the tree.  It worked!  Love those glue dots!


    These would make great gifts on their own without a gift card, especially to bring for the host of a holiday party.  Inexpensive, easy and very fun! LOVE!


Related Posts Plugin for WordPress, Blogger...